Wind Turbine Build
Posted: October 3, 2011 Filed under: Projects 12 CommentsMake sure to read both the Wind Turbine Build and the Solar Panel Build. Then watch The Tech Junkies Episode #9 that documents it all and puts them to the test!
For this build we wanted to make a low cost wind turbine that could give us some good usable power at a low dollar-per-watt budget. We started out designing a 7′ 6″ diameter turbine and used a motor that has a max output of 1,100 Watts. Our goal is to make a wind turbine that costs less than $1 per watt to build and operate. This includes the tower, the wind turbine, and the inverter to tie it in to our electrical system. We were pressed for time on this build because we had very high winds forcasted just two days after we started the build. We needed to come up with something quick to get this thing in the air and see what it could do.
Motor Selection
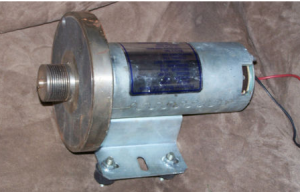
We chose to use a Weslo 1.5 HP DC electric treadmill motor (model# 104593) which we picked up for $35 off eBay. 1.5 HP equates to a little over 1,100 watts of which, if we can utilize 500 watts I would consider this a successful first build. This particular motor rates at about 50 RPM per Volt which we calculated by spinning the motor and measuring the output. We measured about 40 volts at 2,000 RPM by spinning it in our lathe. We tested different speeds and the output seemed to be pretty linear. That means we would need to spin this motor at approximately 6,000 RPM to reach its max voltage of 115 Volts. 50 RPM-per-volt is a little on the high side and means we will have to spin our motor at least 1,000 RPM to generate the 20 Volts minimum to match our Grid Tie Inverter DC input side. We also need to be aware that we shouldn’t spin it faster than 3,000 RPM to stay under our 60 VDC max input for our Grid-Tie inverter. I would recommend finding a motor with a lower RPM per volt as it will be easier to match the blade speed to the motor shaft speed. We will need to gear this motor up from the blade shaft speed to generate any usable power. For a first build it should suit fine for testing.
Motor shaft speed 1,000 RPM to 3,000 RPM = 20VDC to 60VDC
Electrical Grid Tie Inverter Selection
What exactly is a Grid Tie Inverter and why is that what we want to use? It connects to your existing household AC outlet on on side, and your wind turbine on the other. It converts the DC wind power to an AC pure sine-wave matching the phase of the grid. Since the electricity is being generated on the house side of the power meter, the generated power will actually slow down your power meter or bring it to a stop. But if you are lucky enough to have an old dial turning style power meter AND are generating more power than you are using, it is possible to spin your electrical meter BACKWARDS! I didn’t believe it either until we tried it and it worked.
Grid tie inverters have come down in price and gotten pretty good recently. We expected to pay about 25 cents per watt in this part of the build. They are usually stackable too, which means as your system grows, you can just add another grid tie inverter and they will all just work in tandem.
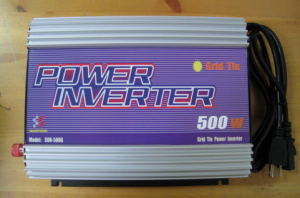
This is the grid tie inverter we got. It was $138 (27.6 cents per watt) and again we sourced this from eBay.
Blade Design and Manufacturing
A lot of thought went into the blade design at first. We learned more than I thought there was to know about a theories, shapes, and efficiency of a turbine blade. The two most important things you will need to know are are that we can only extract a maximum of 59% of the energy of the wind because of Betz’s Law, and that blade design is realistically the least important thing. All different shapes of blades will work just fine and all be relatively close to extracting the same amount of power. Basically we found that you can spend a lot of time in designing the perfect shaped blades, but in practicality they all work about as good as each other. The diameter of the overall blade size is the most direct and easiest way to extract more power from the wind.
I must thank Hugh Piggott for a wealth of information found at http://www.scoraigwind.co.uk and specifically the blade design notes in PDF format found here: Wind Turbine Blade Design
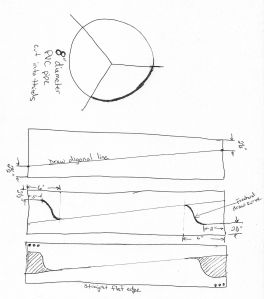
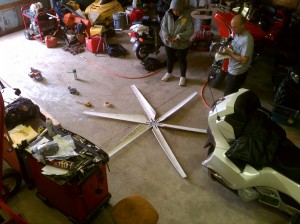
We looked around at 3 different diameter PVC Schedule 40 pipe. Lowes carried 4″ and 6″, but after doing some research we thought that the diameter was just too small for the scale of turbine we were building. We found a company Ferguson Plumbing that sold us a piece of 8″ diameter Schedule 40 PVC 10′ Long for $90. We cut this 43″ long. Then we sliced the PVC into thirds. Each third makes 2 blades leaving us with 6 blades as shown in the picture above. The blades were positioned and bolted 3 bolts per blade onto a 10″ diameter hub around a 4″ diameter inner circle. That left us with 2 x 43″ long (2 blades) and 4″ across the hub = 90″ (7′ 6″) diameter turbine.
Why 6 blades? With 6 blades we have a lower startup or cut in speed and the turbine doesn’t have to spin as fast because the blades are in more places at once catching the wind versus having only 3 blades. We are hoping that this will give us a more consistent rotational speed. With only 3 blades we would need to have thinner blades with a faster tip speed ratio and the rotor would turn faster in higher winds. So we opted for a thicker blade at the tip which spun slower. There is LOTS of theory and like I said before it all boils down to the same basic idea. You can dismiss a lot of the technical blade jargon and still have good working turbine if you just build the damn thing.
Tower Design and Selection
We found an old welded steel frame with a 2″ Pipe attached to it that worked our perfectly for our “tower”. At first we will just be using this basic tower for testing, but ultimately we need to go higher. How High? Lot’s of people told us lots of different things, and from the research we did it seems to all come down to go high, and build far away from trees. The rule of thumb we liked the best was be at least twice as far away from the trees as they are tall AND be at least 30 feet above the top of the tree canopy for best results. This would be pretty tall for our build so we will use what we have and prove out the mechanical of the turbine itself before we invest in going higher. Once we feel we have a solid working turbine we will get some guy wire and extend the height of our tower to see some real world long term testing.
Assembly and Testing
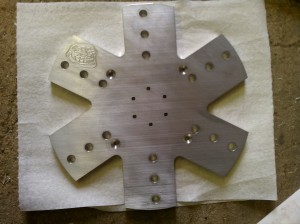
Most of the parts were made from 6061 aluminum in the CNC part of our shop as can be seen above where we cut out a hub for the blades to attach to. We chose 3 bolts 3/8″ in diameter for each blade to attach to the hub. The tail fin is a piece of thin stainless sheet steel we had and the tail body is 1″ aluminum square tubing that we cut to length.
Since we know that the average Joe doesn’t have access to a machine shop, we may decide to offer some of these parts for sale once we finalize a design that we like. Email us [email protected] if you are interested.
The blade shaft spins inside 2 snowmobile idler wheel bearings. Another 2 of these bearings are the pivot point on the tower. This was a first test of holding it together and it seemed to work for a little while. We are currently developing a more secure way to hold everything together with aluminum on the CNC machine. For a first run down test of a wind turbine we just wanted to prove that it is possible, and see how much wind we could capture. Once all these things are figured we can make a more stable and secure turbine which will be ready for taller heights.
On our first tests with the motor’s shaft connected directly to the blade hub we found that in very high wind (20+MPH) we were only spinning about 150 RPM and there was no problem spinning the motor even when it’s wires were shorted creating the most load to the blades. So we should easily be able to gear this up to be able to spin the motor faster. For now we will be testing the turbine in high winds with a straight 1:1 gear ratio.
Results and Thoughts
Here is the breakdown of our costs:
~$50 for Aluminum material
$35 Motor
~$35 PVC for Blades (75 cents per inch and we used 43 inches of the tube)
$10 Paint
$0 Old snowmobile idler wheels and bearings
$0 Stainless sheet steel for tail fin
$0 old tower
$138 Grid Tie Inverter
————-
So for roughly $275 we have built a wind turbine capable of producing about 10 watts in it’s current state, a maximum of 1,100 watts if we can spin the motor at it’s max RPM, and about 500 watts if we can spin it at a reasonable amount.
The next logical step for this turbine is to gear this motor up and get this turbine higher up in the air. That will be coming in part 2 of this build, but for now we wanted to show you the basics of what we did and hopefully learn something in the process. Enjoy and oh teah….don’t touch the blades while they are spinning, they have an incredible amount of built up energy and they will usually win.
Ben


Hi there, thanks for this info. I’m considering to build a DIY wind turbine too. There’s one thing I don’t get: first you say that you should spin at >1000RPM for the inverter, but later you say that you are working at 150RPM. Is the inverter performing only worse at these lower speeds, or did I misunderstood something? Thanks!
@Roel,
In their tests they discovered the RPM-per-volt rating of the motor to be ~50. This means that to get the 20-60VDC that they wanted, they would need to spin the generator 1000-3000RPM (20Vx50RPM and 60Vx50RPM).
The blade they are using right now spins at ~150RPM in 20MPH wind, not enough to power the inverter. To fix this, they are going to add a geartrain to increase the speed of the output to drive the generator at the correct speed.
Awesome!
You don’t have girls do you? They must hate you..
Did not see that trollface. Also exceptionally nice build, Will have a go at this soon!
[…] and doesn’t have very many environmental consequences (unlike hydro power). The Tech Junkies put up a build log of a wind turbine that ended up being a very easy […]
Hey guys,
Loving this build. Really awesome stuff. Do you have an email I can grab you on? I have a few questions.
Ryan
[…] $1(approx.) […]
[…] would be pretty tall for our build so we will use what we have and prove out the mechanical of the Turbine itself before we invest in going higher. Once we feel we have a solid working […]
[…] would be pretty tall for our build so we will use what we have and prove out the mechanical of the Turbine itself before we invest in going higher. Once we feel we have a solid working […]
Nice! I’m experimenting with a homemade wind turbine with a treadmill motor. (Not optimum but for a $25 used treadmill, I couldn’t resist it.)
Mine will look like an old school windmill- 12 galvanized blades total span of 52″. I’m on vacation this week so I might get the blades twisted and mounted on my center disc.
My plan is to charge up and maintain a few led lights in my greenhouse for winter. Just tomatoes and stuff.
[…] Wind Turbine Build – The Tech Junkies | Endeavors of hacks … – Wind Turbine Build Posted: October 3, 2011 | Author: ericbarch | Filed under: Projects | 10 Comments. Make sure to read both the Wind Turbine Build and the Solar …… […]
[…] Wind Turbine Build | The Tech Junkies – Wind Turbine Build Posted: October 3, 2011 | Author: ericbarch | Filed under: Projects | 11 Comments. Make sure to read both the Wind Turbine Build and the Solar … […]